Submissions: Exporting To Sql Server, MySQL, Oracle, Access, Sybase ASE, or ODBC
SQL Server
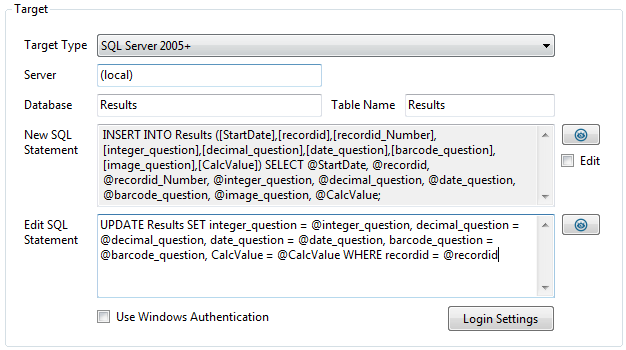
- Enter the server, database and table to populate. The database must already exist.
- To connect to a remote server, use any of the following formats in the Server field:
- ComputerName
- ComputerName:Port
- ComputerName\InstanceName
- ComputerName:Port\InstanceName
- IPAddress
- IPAddress:Port
- IPAddress\InstanceName
- IPAddress:Port\InstanceName
- SQL Server can use either Windows or SQL authentication. Click Login Settings to set the username and password for SQL authentication.
- Check Edit to customize the SQL statement (New SQL Statement) that will be executed for newly received submissions. (See below)
- Edit the SQL statement (Edit SQL Statement) that will be executed for edited submissions.
- Supports versions 2000, 2005, 2008, 2008 R2, 2012, 2014, 2016, 2017.
Azure SQL Server

- Use SQL Server 2005+ type.
- Include full server information. For example: tcp:myserver.database.windows.net,1433
- Do not include the server or domain in the user name.
MySQL

- Enter the server, database and table to populate. The database must already exist.
- MySQL can use MySQL Authentication. Click Login Settings to set the username and password.
- Check Edit to customize the Sql statement (New SQL Statement) that will be executed for newly received submissions. (See below)
- Edit the SQL statement (Edit SQL Statement) that will be executed for edited submissions.
- Uses Connector/Net version 6.5 which supports MySql 5.6, 5.5, 5.1 and 5.0.
Oracle
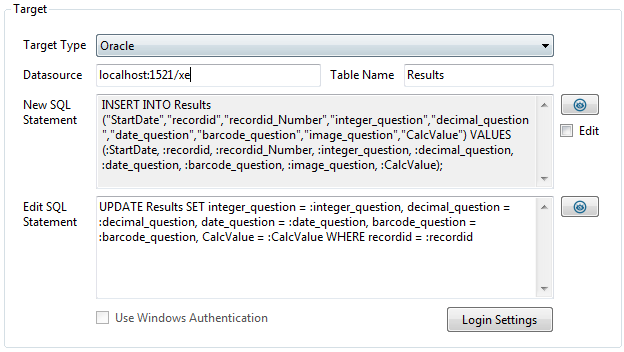
- Enter the data source and table to populate. The database must already exist. The data source can be in the format host:port/instance or a value from the tnsnames.ora file.
- Oracle can use Oracle Authentication. Click Login Settings to set the username and password.
- Check Edit to customize the SQL statement (New SQL Statement) that will be executed for newly received submissions. (See below)
- Edit the SQL statement (Edit SQL Statement) that will be executed for edited submissions.
- Uses ODAC 11.2 Release 4 which supports Oracle 9.2, 10.1, 10.2 and 11.2.
- If Oracle Data Access Components are not installed on the same machine as Sync & Save, you will need to follow the instructions below to download and install them.
Sybase ASE
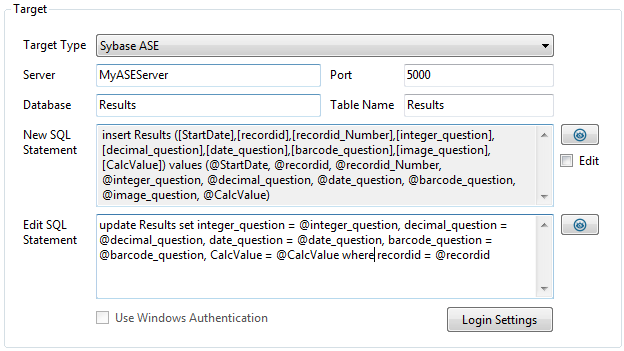
- Enter the server, database, port and table to populate. The database must already exist.
- Click Login Settings to set the username and password.
- Check Edit to customize the Sql statement (New SQL Statement) that will be executed for newly received submissions. (See below)
- Edit the SQL statement (Edit SQL Statement) that will be executed for edited submissions.
- Uses Adaptive Server Enterprise ADO.NET Data Provider 15.7 which supports ASE versions 12.5.x, 15.0.x, 15.5 and 15.7.
- Even though ASE does not support ; as a statement separator, please use ; as the statement separator when customizing SQL statements.
Access
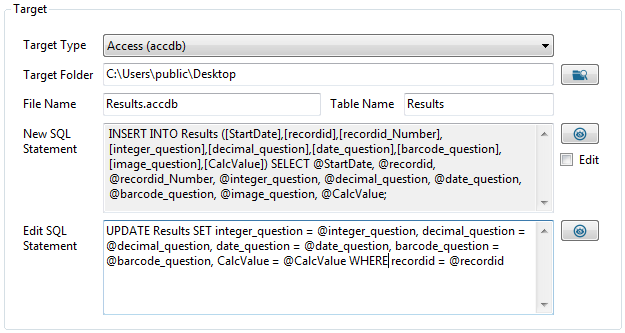
- Enter the folder, file name and table to populate. If the file does not already exist a blank database will be created.
- Supports versions 2000, 2002, 2003, 2007, 2010, 2013, 2016.
- Check Edit to customize the SQL statement (New SQL Statement) that will be executed for newly received submissions. (See below)
- Edit the SQL statement (Edit SQL Statement) that will be executed for edited submissions.
- If Access is not installed on the same machine as Sync & Save, then you will need to download and install the Microsoft Access Database Engine Redistributable.
- If Access is a 32 bit version, you will need to install the 32 bit version of Sync & Save.
Access Automation
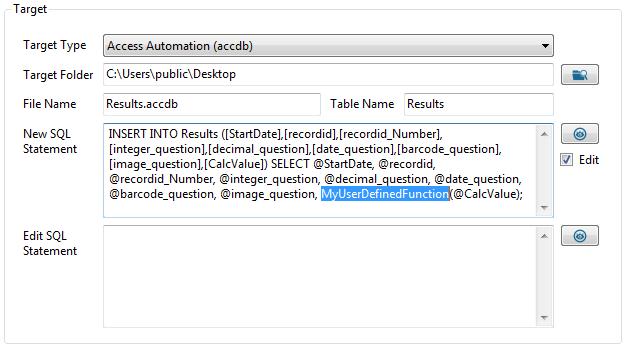
- Access Automation uses the Access database engine instead of OLEDB to execute SQL statements. This allows you to use User Defined Functions that are defined in Access in your SQL statements. If you do not need to use User Defined Functions, please use the standard Access connection described above.
- If Sync & Save backs up, deletes or creates a table in Access, an OLEDB connection is used instead of Access Automation.
- Requires that Access be installed on the same machine as Sync & Save.
- If Access is a 32 bit version, you will need to install the 32 bit version of Sync & Save.
ODBC
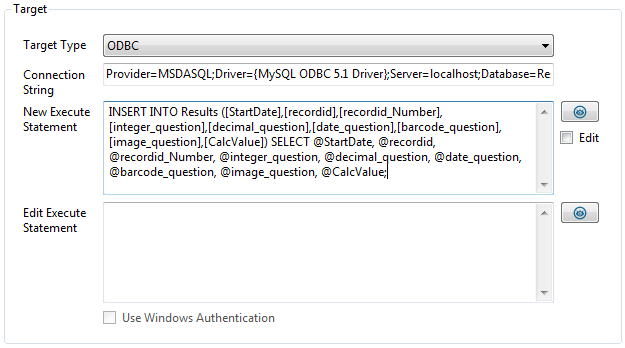
- Enter the connection string for any write enabled ODBC driver installed locally.
- Edit the SQL statement (New SQL Statement) that will be executed for newly received submissions.
- Edit the SQL statement (Edit SQL Statement) that will be executed for edited submissions.
Advanced Options
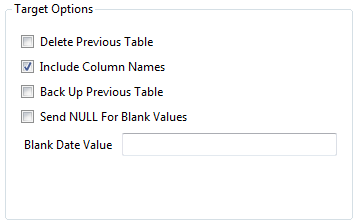
- Check Delete Previous Table to delete and recreate the export table. This insures the table format will match the export format. Leave unchecked to append records to an existing table. Note that if the table format does not match the export format, the export will fail.
- Check Include Column Names to use the Name field from the export format. Otherwise the columns will be named using the column number.
- Check Backup Up Previous Table to make a backup of the last table exported. The backup will add the date and time to the name of the backed up table.
- Check Send NULL for blank values in order to send a NULL instead of a zero length string.
- If you wish to send a specific value (such as "1/1/2000") instead of null dates, enter a value in the Blank Date Value field.
Customizing SQL Statements
SQL statements can be customized by checking Edit.
- Parameter names must match the column names configured on the Format tab. Parameters can be used multiple times. Note that parameter names are case sensitive.
- Un-checking Edit will overwrite any changes with the default insert statement.
- Multiple SQL statements can be executed by separating them with a semicolon. Note that Access does not natively support multiple SQL statements, so for Access, Sync & Save executes each statement individually.
- Any statement that is valid for the target SQL provider can be used.
Data Types
If Delete Previous Table is checked, Sync & Save will create a table with the data types described in this walkthrough article.
Oracle ODAC
The Oracle client software must be installed before connecting to an Oracle database. To install the Oracle client, follow one of the two approaches:
1. Copy the required Oracle client files to your machine:
Go
to the correct ODAC page (32 bit) (64 bit). Download the correct version of ODAC (12.2c Release 1) with XCopy Deployment.
Unzip the file and copy the following files to the install folder of Sync & Save.
32 bit:
ODAC122010Xcopy_32bit\instantclient_12_2\oci.dll
ODAC122010Xcopy_32bit\instantclient_12_2\orannzsbb12.dll
ODAC122010Xcopy_32bit\instantclient_12_2\oraocci12.dll
ODAC122010Xcopy_32bit\instantclient_12_2\ociw32.dll
ODAC122010Xcopy_32bit\instantclient_12_2\oraociei12.dll
ODAC122010Xcopy_32bit\odp.net4\bin\OraOps12.dll
ODAC122010Xcopy_32bit\odp.net4\odp.net\bin\4\Oracle.DataAccess.dll
64 bit:
ODAC122010Xcopy_x64\instantclient_12_2\oci.dll
ODAC122010Xcopy_x64\instantclient_12_2\orannzsbb12.dll
ODAC122010Xcopy_x64\instantclient_12_2\oraocci12.dll
ODAC122010Xcopy_x64\instantclient_12_2\ociw32.dll
ODAC122010Xcopy_x64\instantclient_12_2\oraociei12.dll
ODAC122010Xcopy_x64\odp.net4\bin\OraOps12.dll
ODAC122010Xcopy_x64\odp.net4\odp.net\bin\4\Oracle.DataAccess.dll
2. Install the Oracle Data Access Components for Oracle Client:
Go to the ODAC page. Download the correct version of ODAC with Oracle Developer Tools (12.2c Release 1) for
Visual Studio and run the setup.exe.
In the Oracle Universal Installer, choose the Oracle Data Provider for .Net 4 12.2.0.1.0 and any required components. Note that this installer is much larger than option 1 and is only available for 32 bit.